
Introduction
Jupyter Notebook has become one of the most widely used tools in modern programming, especially in data science, machine learning, and academic research. Its interactive structure allows users to write code, execute it instantly, and see results directly below the code cells. This makes it significantly easier to learn programming concepts in a practical and visual way.
Unlike traditional programming environments, where you write an entire script and then execute it, Jupyter allows step-by-step execution. This makes debugging simpler and experimentation faster.
In this detailed guide, you will explore everything from setup to advanced workflows. You will also understand execution flow, kernel behavior, debugging techniques, and productivity tricks that professionals use daily.
One of the first things beginners search for is how to run code in jupyter notebook because this is the core action that powers the entire environment.
Understanding the Jupyter Notebook Environment
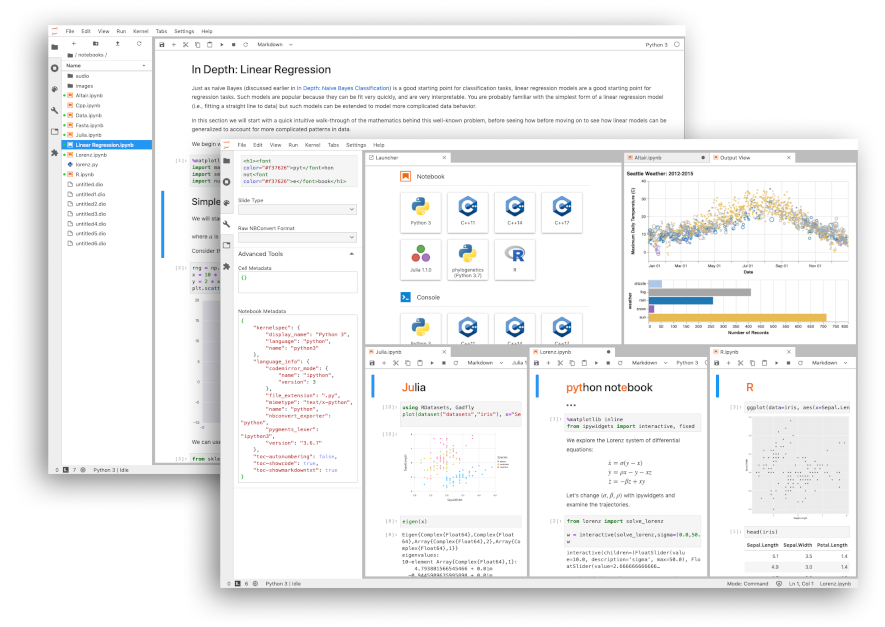
Jupyter Notebook works on a simple but powerful architecture. It consists of a web-based interface, a kernel, and interactive cells. Each of these components plays a crucial role in code execution.
The interface is where you write code. The kernel processes it. The output is then displayed in real time.
A notebook is divided into:
- Code cells for writing programs
- Markdown cells for explanations
- Output areas for results
This structure is what makes Jupyter so beginner-friendly and widely adopted.
At its core, learning how to run code in jupyter notebook helps you unlock the full potential of this environment.
Setting Up Your Jupyter Notebook Workspace
Before you start executing code, you need a working setup.
Most users install Jupyter using Anaconda because it simplifies package management and installation. However, you can also install it manually using pip.
Once installed, you can launch Jupyter by typing:
This opens a browser window where you can create notebooks, manage files, and start coding.
Inside the notebook, everything runs in a live environment. This means changes are reflected immediately, making experimentation seamless.
Understanding how to run code in jupyter notebook becomes meaningful only after setting up this environment correctly.
Writing and Executing Your First Code Cells
A Jupyter Notebook consists of cells, and each cell can hold a piece of code.
When you create a new notebook, you are presented with an empty code cell. You can type Python code directly into it.
For example:
When you execute the cell, the output appears directly below it.
At this point, many beginners truly begin learning how to run code in jupyter notebook because execution is the most important action in the workflow.
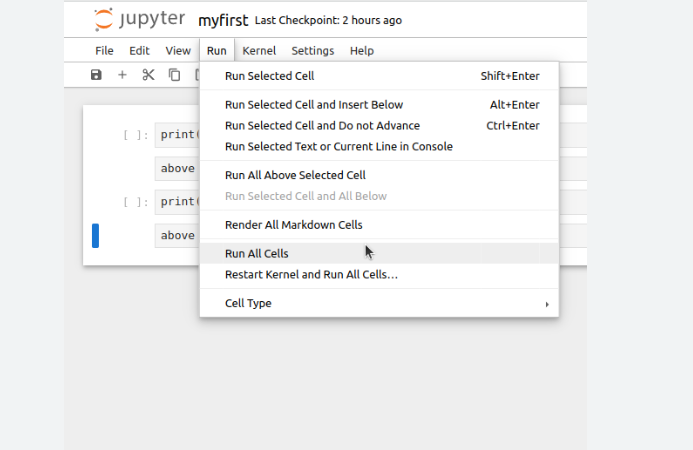
You can run cells using:
- Shift + Enter
- Run button in toolbar
- Menu options
Each execution sends code to the kernel, which processes it and returns output instantly.
Execution Flow Inside Jupyter Notebook
To fully understand Jupyter, you need to understand its execution flow.
When you run a cell:
- Code is sent to the kernel
- Kernel processes the instructions
- Output is returned to the interface
- The result is displayed under the cell
This loop happens every time you execute a cell.
Unlike traditional scripts, Jupyter does not require full program execution. Instead, it allows selective execution, which is extremely useful for testing and debugging.
Mastering how to run code in jupyter notebook gives you control over this execution flow.
Working with Kernels and Their Importance
The kernel is the engine behind Jupyter Notebook. It is responsible for executing all code.
You can:
- Start a kernel
- Restart a kernel
- Interrupt execution
- Reconnect when needed
If a code cell runs into an infinite loop, you can stop it using the interrupt option.
The kernel also stores variables in memory. This means that variables persist across cells until the kernel is restarted.
Understanding kernel behavior is essential when learning how to run code in jupyter notebook efficiently.
Keyboard Shortcuts That Improve Productivity
Jupyter Notebook provides several shortcuts that make coding faster and smoother.
Some important ones include:
| Action | Shortcut |
|---|---|
| Run cell | Shift + Enter |
| Add cell above | A |
| Add cell below | B |
| Delete cell | D + D |
| Save notebook | Ctrl + S |
| Switch to Markdown | M |
Using shortcuts helps you avoid repetitive clicking and improves workflow efficiency.
At this stage, many developers refine their understanding of how to run code in jupyter notebook using shortcuts rather than buttons.
Debugging Code Effectively in Jupyter
Debugging in Jupyter is much easier compared to traditional environments.
Instead of running an entire script, you can isolate problematic cells and test them individually.
Common debugging methods include:
- Printing variable values
- Running small sections of code
- Restarting kernel when necessary
- Re-executing cells in order
Example:
b = 5
print(a / b)
If something goes wrong, you can quickly adjust and rerun the cell.
This flexibility is one of the reasons learners focus on how to run code in jupyter notebook early in their journey.
Avoiding Execution Order Confusion
One of the most common beginner mistakes in Jupyter is running cells out of order.
For example:
- A variable is defined in one cell
- But used before executing that cell
This leads to errors that confuse beginners.
To avoid this:
- Always run cells in sequence
- Use “Run All” before final execution
- Restart kernel when in doubt
Proper execution order is essential when practicing how to run code in jupyter notebook effectively.
Comparison of Jupyter with Other Tools
Here is a simple comparison to understand Jupyter’s position:
| Feature | Jupyter Notebook | VS Code | Google Colab |
|---|---|---|---|
| Ease of Use | Very High | Medium | High |
| Setup | Required | Required | None |
| Execution Style | Cell-based | Script-based | Cell-based |
| Visualization | Excellent | Good | Excellent |
| Collaboration | Limited | Medium | Strong |
Jupyter stands out for its simplicity and interactivity.
Using Tables for Data Understanding
Tables are useful for comparing concepts and organizing information.
Here is an example of execution methods:
| Method | Description | Best Use Case |
|---|---|---|
| Shift + Enter | Runs cell and moves down | Fast coding |
| Ctrl + Enter | Runs cell without moving | Testing outputs |
| Run Button | GUI execution | Beginners |
| Run All | Executes entire notebook | Final review |
This helps reinforce practical understanding of how to run code in jupyter notebook in different scenarios.
Advanced Workflow Techniques
Once you are comfortable with basics, you can explore advanced workflows.
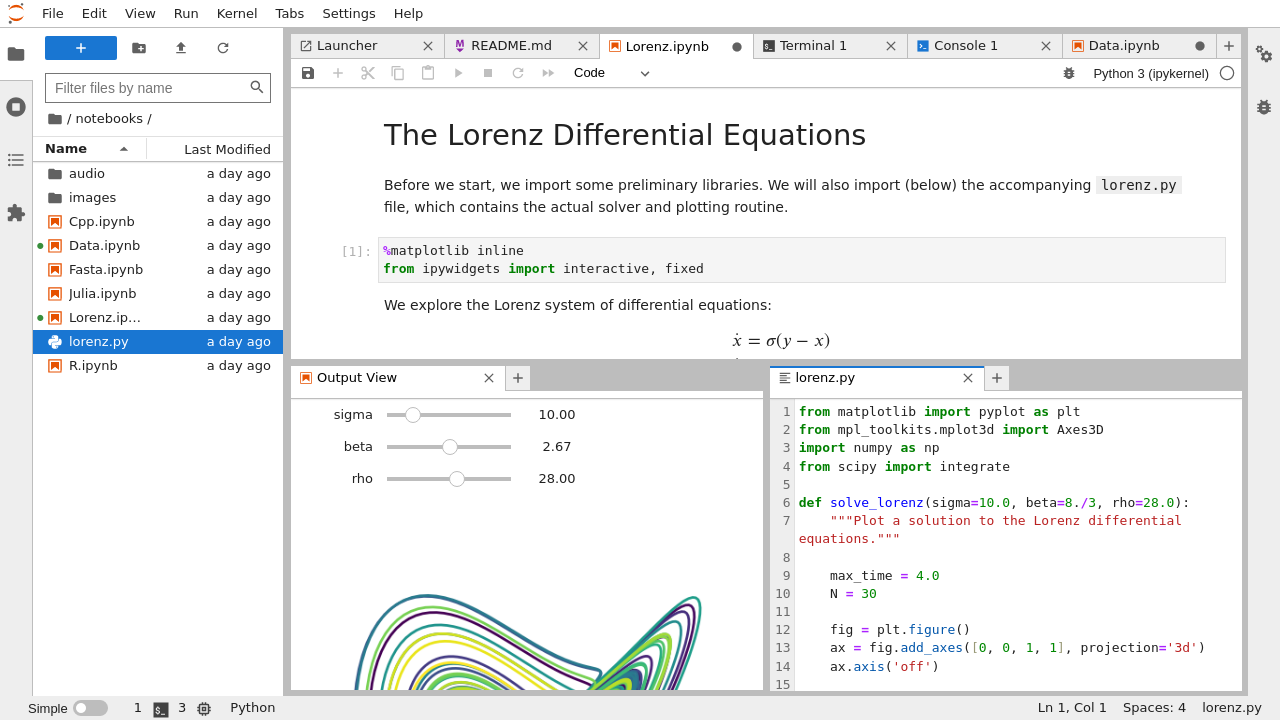
Jupyter supports:
- Magic commands like
%timeand%matplotlib - Integration with libraries like Pandas and NumPy
- Visualization tools for graphs and charts
- Notebook extensions for enhanced productivity
These features make Jupyter powerful for both beginners and professionals.
At this stage, your understanding of how to run code in jupyter notebook evolves into workflow optimization.
Handling Large Projects in Jupyter
For large projects, Jupyter can still be efficient if used properly.
Best practices include:
- Splitting code into logical sections
- Avoiding overly large cells
- Using Markdown for documentation
- Clearing outputs when not needed
These habits ensure performance remains smooth even with complex projects.
Pro Productivity Tip
Always restart your kernel and run all cells before final submission. This ensures your notebook executes in a clean and error-free state.
Common Problems and Their Fixes
Some frequent issues include:
- Kernel not responding
- Cells not executing
- Variables missing
- Unexpected output errors
Most of these can be fixed by restarting the kernel or re-running cells in order.
Understanding execution deeply helps you master how to run code in jupyter notebook without confusion.
Best Practices for Clean Notebooks
A clean notebook improves readability and collaboration.
Follow these practices:
- Use headings for structure
- Add explanations in Markdown
- Keep code modular
- Avoid unnecessary outputs
- Save frequently
A well-organized notebook is easier to debug and share.
Real-World Uses of Jupyter Notebook
Jupyter is used in multiple industries:
- Data science projects
- Machine learning models
- Financial analysis
- Academic research
- Data visualization dashboards
Its flexibility makes it one of the most powerful tools in modern computing.
FAQ Section
What is Jupyter Notebook mainly used for?
It is used for interactive coding, data analysis, visualization, and machine learning.
Can I use languages other than Python?
Yes, Jupyter supports multiple languages including R and Julia.
Why is my notebook not executing cells?
You may need to restart the kernel or check execution order.
Is Jupyter good for beginners?
Yes, it is one of the most beginner-friendly coding environments.
How do I save my work?
You can save using Ctrl + S or the file menu.
Final Conclusion
Jupyter Notebook is a powerful and flexible environment that makes coding interactive, visual, and easy to understand. From writing simple scripts to building complex machine learning models, it supports every stage of development.
Learning how to run code in jupyter notebook is the foundation of using this tool effectively. Once you understand execution flow, kernel behavior, and cell management, everything becomes much easier.
By practicing regularly, using shortcuts, and keeping your notebooks organized, you can significantly improve productivity and reduce errors. Jupyter is not just a tool—it is a complete interactive development environment that enhances the way you learn and build software.
Start experimenting today, and you will quickly gain confidence in working with real-world projects using Jupyter Notebook.